There’s more to buttons than just being closures. You can use them to tie your pieces together and give them the perfect finishing touch. That’s why learning how to sew a button is always at the top of the list in terms of sewing basics. Whether you’re a professional sewer or not, it is essential to have sewing button skills.
Although these little additions may seem intimidating at first, sewing buttons is quite easy once you get the hang of it. It’s an extremely skill to have since buttons do fall off. So in this tutorial, we will show you how to easily and quickly sew a button in a few simple steps either by machine or hand. And don’t worry if you don’t how to sew since this step-by-step guide is aimed at beginners to sewing.
Table of Contents
Different Types Of Button
This type of button can come with 2 or 4 holes. They are also the most common type found in clothing. As its name suggests, these buttons are flat without any loop protruding out of their back. Likewise, the holes will go right through the button from the top to the bottom. You can sew flat buttons using a sewing machine or by hand.
These buttons do not have holes on the top. Instead, they have the holes through an extra barrel-shaped piece at the back of the button. You can only sew shank buttons by hand since there is nothing on top for the sewing machine to go through. This type of button is also ideal for thicker fabrics and jackets since they sit up higher in comparison to flat buttons.
How To Sew A Button By Hand On A Shirt (All Types)
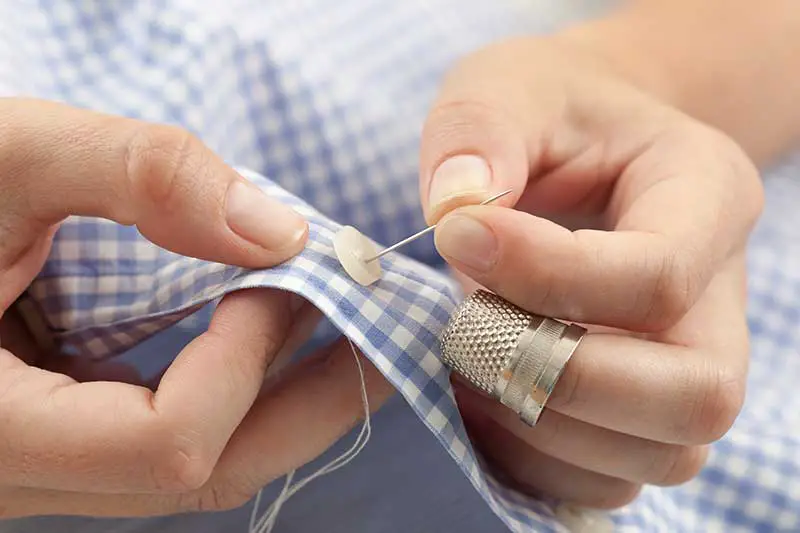
Step 1: Thread The Needle
No matter what type of button you’ll use, the first step you need to do is thread a needle.
For this step, cut 16 inches of thread. Then, thread it double through your needle and knot the end. You can use a single thread but it is usually not strong enough for sewing a button unless your thread is really thick.
If you are having a hard time getting your thread through the eye of the needle, use a needle threader to help you out. These small silver devices often come with a packet of needles and can be very useful.
Step 2: Mark The Position
Mark the position of your button. If you’re going to replace a button, you can obviously see where to sew it. But if you’ll use sewing patterns, they should be marked with a cross or dot on the pattern piece.
On the right side of your fabric, set your needle down into the fabric and come up a short distance away about 1/8 inch or 3mm. Cut any excess thread after the knot. When you are done, the knot will be hidden by the button.
Next, skip to the section with the type of button you’re using, either 2 holes, 4 holes, or shank.
How To Sew A 2-Hole Button By Hand
Materials you’ll need:
- 2-hole button
- Thread
- Needle
- Scissors
- Ruler or measuring tape (optional)
- Pin (optional)
Instructions:
Step 1: Gather your materials
Thread your needle and tie a knot at the end. The length of your thread will depend on the size of your button. However, around 15 to 20 inches should be enough.
Things to keep in mind:
- Use a strong thread or double the string so take it stronger. What you want is for your button to hold.
- Make sure to use a color that matches your fabric or a color that complements your garment.
- Adding a tail will make it easier for you to tie your thread once you’re done and can help create a more secure hold.
Hold the button down on your fabric. Check to ensure that it is in the right position. Use a ruler if necessary to measure where the buttonhole on the corresponding side is or will be.
While holding the button in place, push the threaded needle up through the back of one of the holes in your button. Then, pull until the knot or excess thread reaches the back of the fabric.
Next, push your needle through the second hole of the button from its front to its back. Do not pull tight but ensure that all of the excess thread has moved through.
Push the threaded needle through the original hole from the back to the front once again. Then, push it through the other hole from the front to the back. Repeat these 3 to 4 times. You should be able to loosen your grip on the button after the second pass.
Try to pull your button lightly to see if you have sewn enough thread through the two holes. If it seems like it is strong enough, move on to the next step. If not, continue sewing through the buttonholes until you are ready to finish.
Things to keep in mind:
- You want a bit bit of extra space between your fabric and the button to make it functional.
- Consider looking at one of the shirts in your closet for reference. This is more of a problem on buttons with 4 holes but it’s still worth noting when hand sewing buttons.
- A trick to assure your thread is not pulled too tight is to put a needle or pin between the holes on the front of your button while making your first stitch through. Remove the pin when you are finished stitching.
Step 4: Knot off
Bring the needle up to the top but not through the button. Wrap the thread around the stitches a few times at the base of the button. Then, pass the needle to the side and knot it off.
How To Sew A 4-Hole Button By Hand
Materials you’ll need:
- 4-hole button
- Thread
- Needle
- Scissors
- Ruler or measuring tape (optional)
- Pin (optional)
Instructions:
This method is quite similar to the above 2-hole buttons. Refer to steps 1 and 2 at the top where you need to thread your needle with double thread and mark the position of your needle.
Once you’re done with these steps, continue with step 3 below.
Thread your needle through one hole of the button. Ensure that the button is centered on the mark and put the needle back down through the opposite hole.
Sew through the holes a few more times in a cross pattern. You can sew most 4 hole buttons with the cross pattern but you may also sew it going across or down so you have 2 bars. This is just a personal preference. As long as you have a strong thread and enough stitches, it will hold just as well.
Step 4: Knot off
Bring the needle up to the top but not through the button. Wrap the thread around the stitches a few times at the base of the button. Pass the needle to the side and knot it off.
How To Sew A Shank Button By Hand
Materials you’ll need:
- Shank button
- Thread
- Needle
- Scissors
- Ruler or measuring tape (optional)
- Pin (optional)
Instructions:
Sewing a shank button starts similarly but instead of passing the needle through the center of your button, you will be passing it through the shank (or hole) underneath.
Refer to steps 1 and 2 at the top. Thread your needle with a double thread and mark the position of your needle. Then proceed to the next step below.
Step 3: Thread the shank
Thread your needle through the shank on the base of the button. Make sure to center the button on the mark and put the needle back down into the back of the fabric.
Bring your needle to the top and stitch through the shank a few more times.
Step 4: Knot off
Bring the needle up to the top but not through the button. Pass the needle to the side and knot it off a couple of times.
How To Sew A Button With A Sewing Machine
Learning how to sew a button using a sewing machine can save you valuable time. This is especially true when you have several buttons to sew on a dress or shirt. To do this, you need a button foot, which is generally a very wide open toe for the button to sit under. Likewise, it is specifically shaped to help hold the button in place. You’ll be able to buy a generic one that can fit the majority of low shank machines.
Instructions:
On your fabric, mark the position of your button. If you are worried about the button moving as you sew you can hold it in place using clear tape. Remove it when you have finished sewing.
Place your button under the foot with the holes lined up in the open toe.
Next, set your sewing machine on a zig-zag with a 0.0 stitch length. With a stitch length of 0.0, it will zig-zag from side to side without moving forwards. The width will depend on the exact position of the buttonholes.
Simply utilize your handwheel to ensure the width is suitable and will not hit the sides of the button.
After using the handwheel to do the first couple of stitches, put your foot down and it will zig-zag from hole to hole. Stop when you think you have enough threads. There is no need to be excessive.
Take your button out of the sewing machine. Then, pull the threads to the back and knot off the ends.
How To Sew Buttonholes
Automatic Setting
Generally, your sewing machine will do all the work for you when you use a buttonhole foot. The tool will communicate with your machine when to reverse back, resulting in perfectly-sized buttonholes all the time. Always start a test stitch and check your machine since some begin at the top then go backward. On the other hand, some will begin at the bottom and go forward.
Furthermore, remember not to push or pull your fabric as this will have a bad impact on the tension and will set the buttonhole foot off course. Typically, the buttonhole foot is grooved, allowing the two sides of the buttonhole to stitch up parallel to each other. So if you pull, the material will slip and the foot will take the wrong steps.
Manual Setting
Step 1: First Side
Line up the needle to begin exactly at the top of the T bar ready to sew down the first side in a straight line. Work a stitch width of 2.0 with a length of 0.3 to 0.5.
As you get to the end of the first line, slow down your sewing machine, stopping at the T bar.
Step 2: First T Bar
Ensure your machine needle is up and turn your setting to the next step of the buttonhole. Try a width of 5.0 and a length of 0. Your machine should stitch several stitches across the bottom of the buttonhole to secure the T bar.
If you are worried here, you can turn the flywheel by hand to make about six stitches to secure the end of the buttonhole.
Step 3: Second Side
Set your machine to the third setting of the buttonhole. Set a stitch width of 2.0 with a length of 03-0.5.
Check to see if your needle is on the correct side of the buttonhole and ready to travel back to the top of the buttonhole. You will go in reverse at this stage. Let your sewing machine do the work as the buttonhole foot guides the stitches to the other end of the T and ends next to the point where you started.
Finish this step with the needle up as you adjust the stitch on your machine.
Step 4: Last T bar
On this step, the machine stitch should be ready to do several stitches across the end of the buttonhole. Set the width to 5.0 and the length to 0.
It is vital at this stage to see that the stitches are going to cover the gap at the end of the buttonhole. Again, you can control the flywheel by hand if you like.
On some machines, there is a fifth option of a little stitch just to run the threads in and secure the end.


