Your favorite piece of clothing has a hole in it? No matter if moths or your own clumsiness are responsible for that, the damage is done and now you have to say goodbye to your used-to-be staple garment… Or not. Actually, with a few basic sewing tools and a couple of steps that we’ll guide you through in this article, you can make your favorite shirt or pants be just like new.
Table of Contents
The Right Tools For The Job
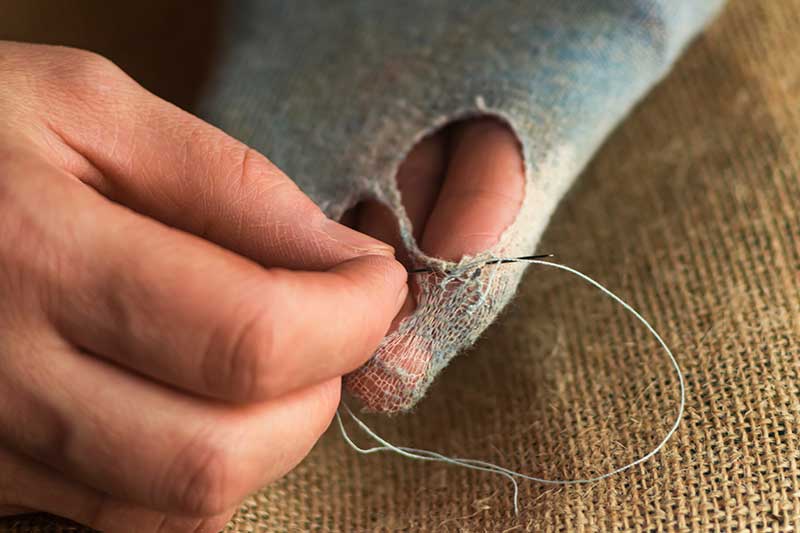
Let’s start with things you’ll need to make your garment almost as new – a thread and a needle. Depending on the hole, the stitch might or might not be visible. If it is, use a thread that matches the color of your garment. There are situations where a contrasting thread can also look stylish. For example, when sewing a hole on the back pocket of your jeans. If the stitch won’t be visible from the outside, then the color of the thread doesn’t matter.
Polyester or cotton thread? In general, it’s always better to match the thread to the garment fabric. For most sewing projects, a single thread will do the job. However, for areas that are more prone to tearing, like crotch or elbows, it’s better to use a double thread. Finally, make sure you have enough thread to sew the hole. If you’re not sure how much you’ll need, take the thread and lay it over the hole, for referencing purposes. Add at least 10 more inches to that amount of thread, and you’re set.
Choosing a proper needle for this project is also important. The lighter the fabric is, the smaller needle – the heavier the fabric is, the larger the needle. Most needle packagings have two numbers shown as a fraction. A larger number indicates a European sizing system that ranges from 60 to 120, while a smaller number refers to an American sizing system from 8 to 20. The larger the numbers in that fraction are, the thicker the needle is.
If you’re working with thick fabrics like leather or denim, or you need to sew through multiple layers, you’ll need a thick needle. Depending on the heaviness of the fabric, a 16 to 20-gauge needle will be ideal. For thin fabrics, choose an 8 to 14-gauge needle.
Finally, different fabrics require a different type of needle. Sharp-tipped needles are suitable for woven materials, while rounded needles are used for knits and stretchy fabrics. Universal needles are a “middle ground.” They won’t work as well as a dedicated needle for that kind of fabric would, but they’ll get the job done.
Clothing Seam Hole
Repairing a ripped seam is simple. Turn the garment inside out to better reach the seam. If you’re using a sewing machine, go over the seam hole with a classic straight stitch a few times. Make sure to start sewing the seam about an inch before and after you go over the hole. That way, you’re making sure the stitch is stronger than before.
If you’re sewing by hand, there are two good stitch choices. The running stitch is fast and easy. It’s a stitch most beginners opt for and it also looks fashionable. The second stitch that’s suitable for hand sewing ripped seams is the backstitch. It takes a little more time than the running stitch, but it’s more durable.
Sewing Long or L-shaped Holes
With these kinds of holes, two fabric edges can be closed together, and it’s just as easily mended as a seam hole. In this case, interfacing can be of great help for connecting ripped edges. This is also a great way of reinforcing the area and prevent fraying in the future.
When machine sewing, stitch the hole on the right side of the garment by going through the interfacing. Use either the zigzag or straight stitch. Both of these stitches close the edges nicely, and it’s barely noticeable when using a thread of matching color.
If you’re sewing by hand, your stitch of choice will be the invisible stitch. Also called the ladder stitch, it closes up the hole while keeping the thread invisible. When done well, no one will know your favorite garment ever had a tear.
Darning
But what if there’s a piece of fabric missing? This kind of hole is harder to sew – but not impossible. In such a case, darning is the way to go. Starting from the top, cover the hole with horizontal straight stitches. When you finish covering it longitudinally, start crisscrossing the thread vertically. Basically, you’re weaving the thread and replacing the missing part of the fabric.
Darning can be done with a sewing machine, too. The process is generally the same – sew straight stitches until you cover the hole, then rotate the garment by 90 degrees, and repeat the same thing. With a matching thread color and fiber, darning is barely noticeable.
However, you can also use a contrasting thread for darning and make your garment more interesting and fashionable. Nowadays, you can see that as a common detail on jeans and other denim apparel.
Furthermore, you can also use decorative stitches to mend rips and holes. Arrowhead and satin stitches are a great way to spice up your garment while repairing a tear. Don’t forget to use a stabilizer to keep frayed ends in place while creating a unique detail.
Finally, a hole can be repaired with a patch. If your garment is made of thick fabric, an iron-on patch is a quick and stylish fix. To further secure it in place, stitch over the edges. This, however, isn’t a great option for thinner fabrics. Generally, these types of patches are very thick, so ironing them over a delicate material might distort the shape.
In Conclusion
As you see, there’s no reason to say goodbye to your favorite shirt or jeans just because a moment of carelessness ended up in tearing it up. With basic sewing skills and adequate sewing tools, you can repair a hole all the while breathing new life into an old staple.
