If you have a sewing machine that can sew thick fabrics comfortably, it will be able to handle most garment-weight leathers. However, there are some issues with this. On top of that list is that the leather you have is most likely too thick for your machine. It may give you broken stitches, skipped, or worse would not even fit under the presser foot of an ordinary sewing machine, let alone move ahead and sew the leather seams.
Another problem is that the normal lockstitch that your machine gives is slightly weak for joining the leather fabric together. When you cut a lock stitch in any place, it unwinds itself to some distance. Meanwhile, hand stitching is pretty sturdy. Likewise, it will keep your leather together more securely for quite some time. But the charm of leather is incomparable that’s why most people prefer it over other materials on the market.
Table of Contents
Hand Sewing Leather
As mentioned, leather is a thick and tough material to sew, especially for a hand tapestry. You will need the right tools to efficiently sew the leather and properly perform the stitches.
But once you have an understanding of how to sew leather by hand, it will surely become an easy task for you. So now is the time to showcase your hand-stitching techniques and create amazing stitches using the leather.
If you’re a beginner sewer, this simple tutorial and guide is especially for you.
Materials and Tools You’ll Need
One of the most satisfying hobbies around is leather crafting. Although the tools may be quite elaborate and not cheap, you can still create some good leather-work using minimum basic tools as well.
- Good-quality leather
- Sharp rotary cutter or a very sturdy and sharp Exacto knife
- A special leather marking tool shaped like a fork or the overstitch wheel. You will use this to evenly mark the stitching holes and equally distanced on leather. This will ensure that you give the marks with the exact distance you want between stitches. The tool will have numbers that will indicate the space per stitch.
- An awl to make holes for sewing
- Two Straight leather needles. If you will make the holes before sewing, you may use regular sewing needles. Otherwise, you can use the leather needles with sharp triangular points at the tips for penetrating the leather.
- A waxing linen cord, which is best for hand stitching. Some alternatives include a thick cotton thread which you need to wax or a pre-waxed cotton cord. However, experts highly recommend linen thread.
- Beeswax to help extend the life of your thread and prevent fraying while sewing.
- A leather clamp to rest the leather as you sew. This is optional but very helpful to make sewing easier.
Step By Step Guide On How To Sew Leather By Hand
Step 1: Prepare the needle and thread
Measure the area to be sewn and multiply it by 3. This is how much thread you should take on each of your needles. However, make sure that the length is not longer than 24 inches since it will be difficult for you to manage if it’s longer than that. You can rub the thread with beeswax to make your thread compliant and good for stitching.
Thread your 2 needles with each end of the thread. Rather than simply inserting the thread through the needle holes, you can make a knot by inserting the needle eye through the thread.
Take it up and you will have the edge of the thread anchored near the eye of the needle. This will help prevent the thread from slipping off. Keep in mind that this is only possible with thin needles.
Step 2: Prepare your leather fabric
You need to prepare thick leather for sewing. If your material very thick, you may even have to gouge channels to facilitate sewing. Doing so can lessen the thickness of your leather layers. There are special chiseling tools or you can use such as the Exacto knife to make these.
Then, mark the holes evenly for stitching. You can use the stitching wheel to make uniform marks through which you can carry your needles. On these marks, you can further make holes. Nevertheless, these are made as you are sewing leather. After making each stitch, make holes using an awl along the marks you have marked. Ensure that you are making uniform-sized holes that will be just enough to carry your needle through.
Step 3: Start stitching
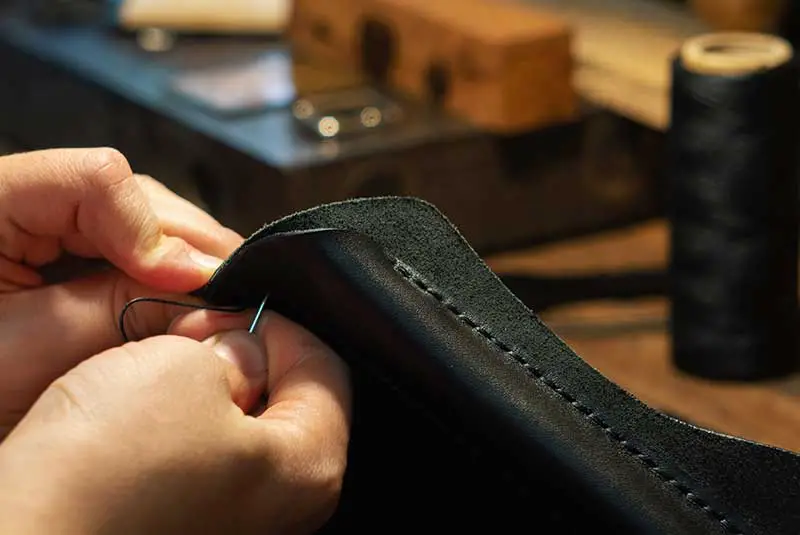
Saddle stitch is the best hand sewing stitch for leather. Still, you can also use close whipping stitches. Just make sure your stitches are clean, tight, and evenly made.
Saddle stitching leather:
- On your stitching line, make the first hole with a sharp awl. Insert needle number 1 through the hole.
- Now make the next hole. Bring the first needle through the second hole to the front side.
- Take the second needle through the same hole to the backside. Here you will be inserting both your needles through the same hole. One will go to the front and the other will go to the back. These actions are repeated to make the saddle stitches. As you tighten the stitch, one saddle stitch is made.
- Make your third hole by taking your first needle to the back through the hole.
- Bring your second needle to the front through the same hole.
- Continue making stitches this way.
Never pull the thread very tightly after a stitch is made. You will distort the leather or worse tear. But you have to pull enough to make the stitch firm.
At the end of the stitches remember to backstitch to the previous hole. Then, make a knot and cut the thread closely. You can use a soft hammer to make the stitches smooth.
Whipping stitch
The edges of the leather layers are joined together using a whipping stitch, which you will make on the right side of the leather.
Step 4: Burn up the excess threads
You may burn up the fluffy portion of the thread to make it look neat and professionally sewn. Using a lighter will do the trick.
That’s it! You’re done with learning how to sew leather by hand. You may now display your leather creation or you may consider embellishing it with stylish designs to enhance its appearance even more.


