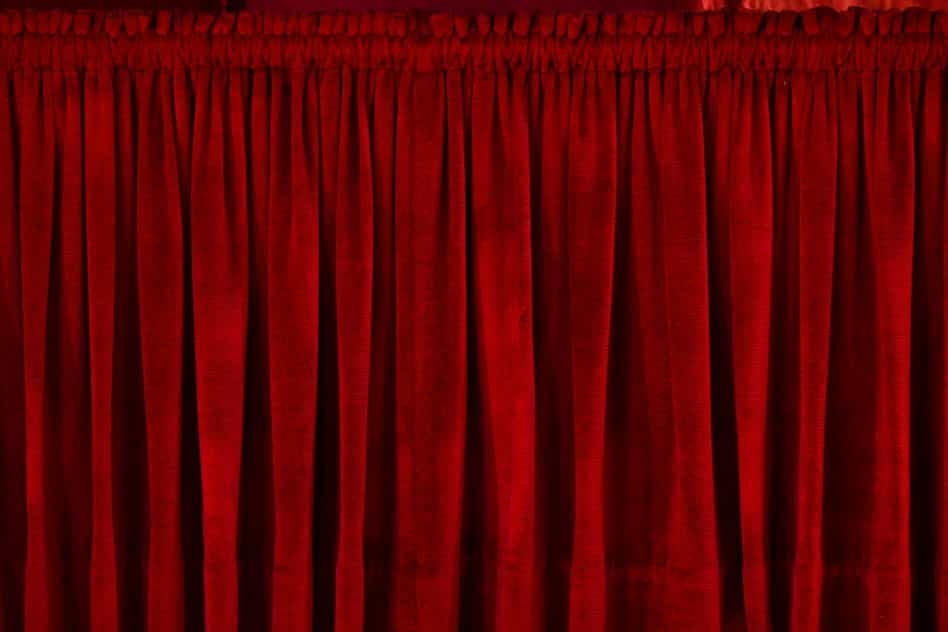
Sewing curtains with velvet material can be difficult due to the way the material is constructed. This article aims to describe and show the steps to successfully sewing velvet curtains, but before doing that we must first understand what velvet is and its forms.
Velvet can be defined as a form of woven tufted fabric with cut threads that haven’t been distributed evenly. This causes it to form into a short dense grouping, making it distinctly soft. This material is so soft, a phrase “smooth like velvet” was coined. It can be constructed from natural or synthetic fibers.
Table of Contents
Types of Velvet
- Chiffon velvet: which is a very light velvet placed on a chiffon or silk base.
- Crushed velvet: which is a lustrous velvet that has been pressed with a pattern
- Devoré (also known as burnout): This is when velvet gets cured with a corrosive solution that dissolves areas to create a pattern on the fabric.
- Embossed: This velvet is made when a metal stamp-roller is heat-pressed onto the fabric to produce a pattern.
- Hammered: This velvet type appears crushed, very lustrous and dappled.
- Lyons: This type is one that has been densely woven to result in a stiff, heavier. Typically used for coat collars, hats, and garments.
- Mirror: A form of velvet that is particularly light and soft.
- Nacré: this velvet has a similar effect and look to a certain type of silk.
- Panne: another form of creased velvet which is created by pushing the material in one direction by putting extreme pressure
- Pile-on-pile: This is a very luxurious form of velvet made by weaving piles with varying heights together.
- Plain: usually made from cotton and is very multi-purpose.
- Utrecht: A crimped and pressed velvet linked with Utrecht in the Netherlands.
- Velveteen: is an imitative form of velvet that is typically made from cotton or from a mixture of silk and cotton.
- Voided: is a form of cotton that has been purposely woven with satin to create a pattern.
Velvet as a luxuriously soft fabric is useful for numerous different items when sewed using a sewing machine. It is particularly great for creating stately looking sound and light blocking curtains.
While they look expensive and beautiful, making velvet curtains are really a labor of love more than anything else. You might seem confused as to where to begin when sewing velvet curtains, but below are a couple steps, if which followed will result in you having beautifully sewn velvet drapes that will wow everyone that sees them.
Create A Specific Velvet Sewing Area
Working with and cutting velvet is bound to create bits and pieces of cut fabric. And this can quickly spread, falling onto the floor. It makes sense to at the very least contain these bits and pieces into one specific area.
It also helps to consider items of clothing you are going to put on when cutting the fabric, as the cut velvet is likely to stick to you. Ensure a vaccine cleaner is nearby, with a brush attachment to help you gently cleanses both fabric and sewing machine area while you work.
This helps to avoid cleaning a massive mess when you are finally finished with the sewing.
Locate and Mark the Nap of The Fabric
Velvet fabric has a very different appearance which is dependent on the way the nap runs. The most common directions velvet fabrics have is when the nap runs downward. This creates a silky and soft lighter shade of the original color chosen.
Upward facing naps appear darker than downward naps. This makes the velvet fabric appear a bit like suede, however, it is susceptible to dust as the fabric fibers attract quite a bit of dust. This makes them not the best choice for making velvet curtains.
When the direction of the nap has been finally selected, you should mark the fabric on the back so you don’t get confused when the sections are to be matched together.
An important detail to never forget when sewing velvet curtains is that every panel has to be seen with the nap facing the same direction.
Join the Seams Together Carefully
Once the fabric has been cut to your specifications with the nap facing the same direction, the next step is to join the Seams together. Velvet can be a particularly thick fabric and that means it has to be cared for before being stitched together. The way your velvet curtains look all depend on this step and how much care is taken in it.
Once the curtain panels have been carefully measured and cut, the seams should be brought together with the correct sides facing. If the aim is to have the nap face a downward direction, the nap should then be smoothed into that direction on every piece of velvet fabric that is to be seen together.
Ensure that every bit of the nap has been smoothed out, before holding the cut fabric together with pins. If you are not quite satisfied with pinning you can switch to basting, however pinning the fabric carefully should be sufficient.
Hemming on Velvet
While double hems are particularly popular when making drapes and curtains, it is best to stick a single thick hem on the velvet material with a sewing machine.
The raw edge of the fabric should be overlocked, or zig zagged to ensure it doesn’t unravel when it is being folded. Once this is done, the hem should be folded to the required length and then stitched.
Conclusion
Velvet is an extremely beautiful, luxurious yet soft fabric, which when used can result in lavish looking curtains. Following the tips and steps above is sure to help you create velvet curtains that look even better than store-bought ones, all at just a fraction of the cost.
Side note: the way you stitch using a sewing machine is not only vital but is usually underemphasized. Thick fabric like velvet typically move the lower and upper pieces of a sewing machine at different and perhaps separate speeds, it might be wise to use a walking foot when deciding to see velvet. This ensures the final result is much more satisfying.
