It is always disappointing if you accidentally tear an item of your clothing, especially if it’s one of your favorites. However, all is not lost. There are ways of repairing rips and tears and we’ll guide you in the process. If it’s your seam that has come apart, it is easy to repair. All you have to do is to sew over where the seam was. However, if the hole is in the actual fabric, it is more difficult to repair and you may need to sew on a patch.
Table of Contents
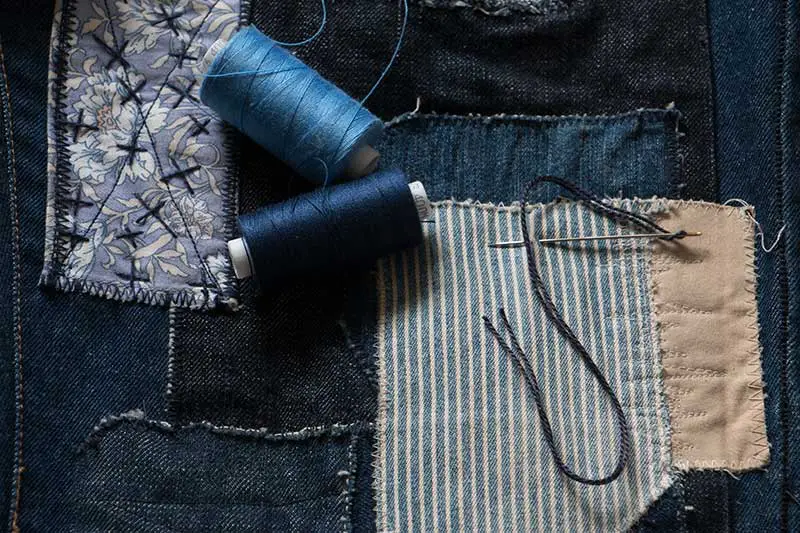
Choosing a Needle and Thread
If you are stitching a tear on the fabric of your garment, you will need to get thread that matches the material. It’s not so important if you are sewing a seam, but you might want to anyway for aesthetic’s sake.
Once you have chosen your thread, it is time to pick a suitable needle. This depends on what fabric you are sewing. If you are sewing a lighter material like silk, linen, nylon, polyester, or cotton, you will need a higher gauge of needle. These needles are lighter, while lower gauge needles are thicker. They are suitable for thicker materials such as leather and denim. It is important that you have this type of needle for leather as it’s easy to break finer needles when trying to sew. A round-tipped needle is suitable for knitted fabrics, while a sharp tip should be used with woven fabric.
You will need to cut at least 10 inches of thread that is longer than the seam or hole. If you are sewing something thick, you might even need twice as much. It takes more thread to sew thicker material than thinner. It is always better to cut more than you think you might need. It is easier to cut off extra thread rather than having to redo the whole project because you didn’t cut off enough thread.
To make sure that the material is secure, tie a knot in one end of the thread or do a backstitch. If you are sewing a thick fabric you might need the help of a solid board to help you to push the needle through.
How to Sew a Split Seam
A split seam is generally easy to sew. The first thing to do is to turn the garment inside out which will expose the seam. Iron the seam so that the two pieces of material that need to be sewn, lay flat against each other. Then pin them together.
You can either sew by hand or with a sewing machine. Whichever method you use, remember to overlap the seam which is still intact, and tie a knot in the thread. Small stitches are the best option as they will make the seam secure. Cut any thread left when you get to the other end of the hole after securing it with a knot.
How to Sew a Tear
You may be able to sew the tear together without any cloth, but if the hole is big you will need a patch. If you don’t, the material may pucker and tug at the shape of the garment. The patch should be the same color as the fabric unless you want to make a statement with a contrasting color or print.
If the hole is frayed, you will need to strengthen it. This can often happen in the knees of jeans or the elbows of a jacket. Put a small piece of material cut to size underneath the hole, right size up and then bring the edges of the garment as close as you can so that the patch holds when stitched. Sew another patch on top of this on the right side of the garment.
This probably won’t look that attractive, but if you are doing this to mend a pair of work jeans, it will be fine. You could always add more patches to the jeans in different colors and styles. You could put buttons on the patch to make it look fun. A good fix for jackets where the elbows have worn away is a piece of leather on each elbow. They will look smart as well as stylish.
If the hole is particularly frayed, it’s a good idea to use a liquid sealant to glue the patch on before sewing. This should make the fix permanent and prevent it from fraying again. If the cloth is badly frayed, you may also need to sew it once and then fold over once and sew again. This is the best way to stop the cloth from tearing again.
You may decide to just sew up the tear without adding a patch. If so, turn the garment inside out. To strengthen the ends of the hole, begin by sewing an inch before the rip starts. Do a backstitch first to reinforce the repair and to stop the fabric from tearing again. Then carefully weave the thread in and out of the fabric. Be sure to just pick up a little bit of the material so that the stitching doesn’t show on the outside of the garment.
Once you have sewn around the hole, backstitch and tie a knot in the thread. Then press the material.
How to Sew a Patch for Thinner Fabric
You will need two patches, one for underneath the hole and the other for the top. First of all trim any frayed edges that are there. Put some liquid sealant around the edges of the bottom patch and stick it underneath the hole. With the top patch, fold a little bit over all the way around and press into place with liquid sealant.
Turn the garment inside out and sew the bottom patch first with small stitches that are close to each other. Make sure that all the edges of the hole are covered by the patch. It’s a good idea to stitch twice to reinforce the patch.
The next step is to sew the top patch. Put the folded piece down onto the fabric. Make sure that it covers all of the hole. Hand sew the patch onto the top of the garment, going around several times to strengthen the repair. In addition to sewing a straight stitch, you can make the patch look pretty with a blanket stitch as well.
Conclusion
There are different ways to sew a tear in your garments. Sewing a hole in a seam is easy and won’t affect the look of your clothing. However, it is more difficult to repair a hole in the fabric itself. You will have to make up your mind if you want a rustic look or if it’s time to throw the item of clothing away.

