Sew on snaps are an easy way to finish your garment and avoid stressful buttonhole problems. They are ideal for closing a narrow opening or a blouse that only needs some additional closure. A simple snap is a very good option if your blouse is gaping. And learning how to sew on snaps is easy breezy. So let’s get started.
Table of Contents
What Are Snap Closures?
In dressmaking, snaps are types of fasteners that you can use to connect abutted edges and lapped edges over a variety of clothing items and designs. They present incredible versatility in terms of aesthetics and function. While the holding power of the snap mechanism is not as strong in comparison to hook and eye application, they are much easier to open and close. That’s because it is designed to be open when you pull it apart.
The snap’s ball and socket mechanism allow for an effortless yet firm opening and closing. Its versatility and various snap closure styles available on the market enable you to pick the right style and size for any garment, from heavy-duty to lightweight.
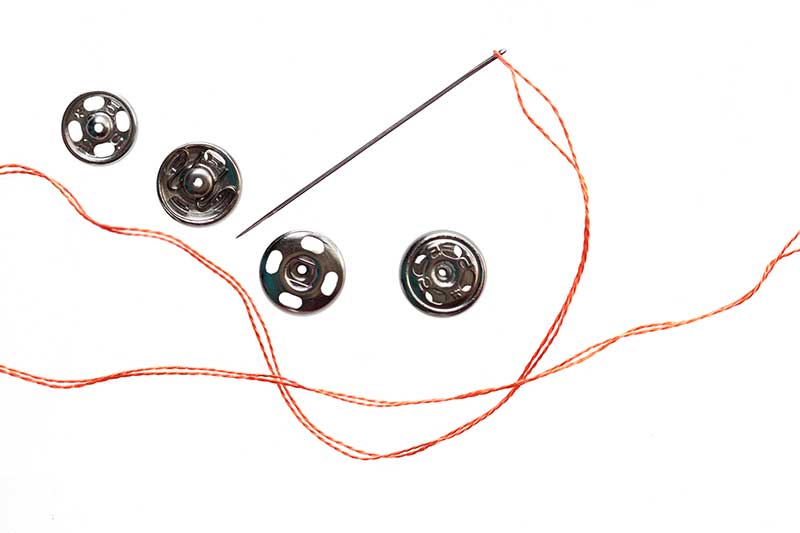
Sew-on snaps are a type of snaps that you hand sew to the fabric’s surface using a whipstitch. These are mostly used by home dressmakers and come with a ball and socket mechanism as well as sewing holes. If you’re a beginner sewer, they are a great way to start with. That’s because you can easily take them out if you apply them the wrong way and not incur any damage to your fabric.
Other types of snaps include no-sew snaps, fabric-covered snaps, and magnetic purse snaps. You can use snaps for collars, waistband areas, and cuffs. Also, you can even use it for an entire garment edge application at the opening of your jacket, coat, cardigan, bottoms, and tops.
Different Types Of Sew On Snaps
Sew on snaps or press studs are available in various colors and sizes. Their varieties include plastic, metallic, and clear. Metal is the most common option you can find in stores since it is the most conventional and because of its durability.
Furthermore, they are available in different finishes, such as black, nickel, and even gold-tone. You can use bigger snaps for heavier materials while smaller snaps work well on silk and other lightweight fabrics since they provide a more discrete look.
Parts Of A Snap
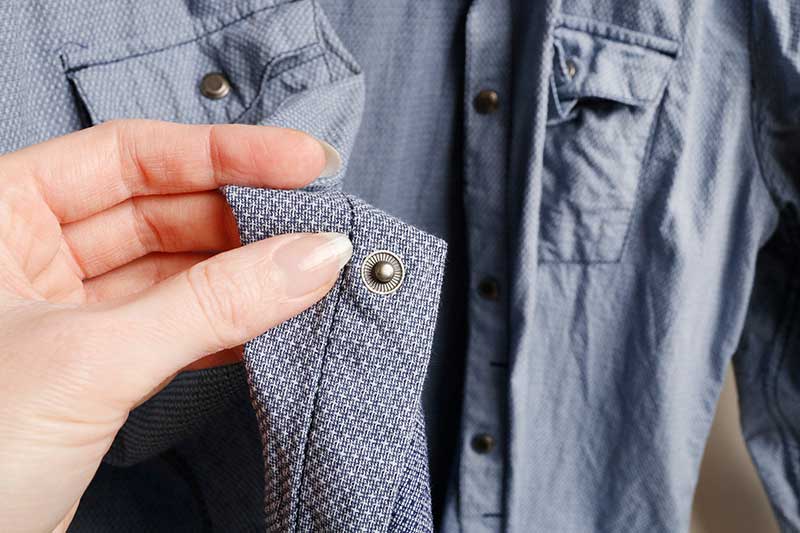
All snaps come with two parts that snap together. One side of the snap is called the ball. This has a little-rounded knob sticking up. Meanwhile, the other side is the socket where the ball fits into it. Once you fit these together, they will connect and join up to fasten your garment.
The ball side of the snap is sewn on the overlap side (inside of the top flap) of the fabric. You will then match it up with the socket on the underside of your garment.
A snap’s mechanism is the same across all styles, whether it is sew on or no-sew snap. The ball piece is inserted into the socket which allows the two portions to simply snap in place. You should hear and feel a little “snap” when the two pieces are fully closed.
It is the opening process that adds the most strain to a snap closure once you have attached it to your garment. Since we usually pull by the garment edges to open the snaps, the strain is inadvertently added to the fabric and thread around the attachment area of the snap. For this reason, how snaps are attached as well as the types of snaps used, should be chosen carefully according to the thickness of the fabric layers as well as the type of fabric and design at hand.
Step By Step Guide On How To Sew On Snaps
Step 1: Separate And Mark
Separate the halves of the snap and grab the ball side first. Mark the position of your ball snap on the underside of the top flap.
Step 2: Knot
Start your stitching with a knot or double backstitch that will lie beneath the snap. If you have a double layer of fabric then just go through the top layer for an invisible finish.
Step 3: Sew Through Holes
Thread your needle through one of the holes at the edge of the snap. Next, work through each hole with 2 to 3 stitches to make it secure. Once again make sure that you do not have stitches showing on the right side of the garment. You can stitch with a normal overstitch or you can be fancy and use a buttonhole stitch.
Step 4: Next Holes
Once you are finished with your first few stitches, move to the next hole. Simply push the needle across through the top layer of your fabric. In general, there are four holes around the edge of the snap. Some brands may have more or fewer holes.
Knot off with a stitch concealed under the snap.
Step 5: Repeat
Now repeat for the socket side of the snap. The socket side will be sewn on the top of the underside of the flap.
How to sew on snaps is not a hard sewing project to learn. Just make sure that your labor of love does not have any snags or snips.
How To Line Up A Snap
You can use a pin when marking and measuring. However, the surest way to get the ball of the snap to connect with the socket is to sew the ball side in place first. Then, rub a tailor’s chalk on the tip of the ball and press it over to the place where it will meet the socket.
The chalk that rubs off will mark the exact spot for the sewing of the other half. Now you have a perfect match.
Easy Alternative
You may also consider using a snap tape if you’re planning on lining up several sew on snaps in a row. Snap tape has the ball snaps on one side of the tape and the socket snaps in a row on the other. You can sew in this tape together with all the snaps ready to connect. Simply sew along the edges of the tape with a zipper foot.

