
While we may have jackets and cardigans with zippers on the outside, when it comes to dresses ot skirts, you don’t want to see the zipper. In this article, we will be telling you how to sew an invisible zipper. It isn’t that different from sewing an ordinary zipper, but there are some differences.
Table of Contents
Select Your Zipper
If you are sewing an invisible zipper, you will need to purchase a zipper that is two inches longer than the zipper opening. If the zipper opening is 12 inches, choose a zipper that is 14 inches longer. .
It will look tidier and smarter if the color of the zipper is the same as your dress. If you can’t find an exact match, choose something similar. For example, buy a black zipper if your dress is dark purple, or a white zipper if the fabric is light blue.
Cut and Apply the Interfacing Strips
You will need two fusible interfacing strips, one for each side of the zipper as you can’t sew the zipper onto the fabric. The material alone wouldn’t be strong enough to support the zipper properly
The interfaces need to be 1.5 inches longer than the zipper opening. They need to be the same width as your zipper, plus the width of your seam allowance. For example, if your zipper is 2 inches wide and the seam allowance is 0.5 inches, the interfaces need to be 2.5 inches wide.
You will need to fit a zipper foot onto your sewing machine. Your appliance should have instructions on how to do this. It is simple. Usually, you just have to undo the screws holding the regular pressure foot in place and remove it. Then install the zipper foot.
Turn the material inside out and place it on a flat surface like an ironing board. Put the interfacing strips where you want the zipper to be. Press each strip one at a time with an iron for 3 – 5 seconds. The iron should be on the lowest setting. Make sure that the interfacing is flat otherwise you might get bumps.
Pin and Sew the Zipper
Iron the zipper fabric next, again on the lowest setting. You will want it to be flat from an aesthetic point of view. Be careful if the zipper itself is made from plastic as it could melt. Metal is much better.
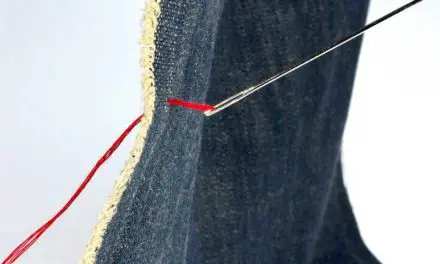
Close the zipper and place it on the right side of the fabric. The zipper pull should be pointing downwards and the zipper should be closed.
Line up the edge of the fabric with the edge on the zipper fabric. Insert a pin at the top of the zipper fabric and the interfacing. Open the zipper and carry on pinning the zipper to the material. Don’t worry about pinning the part of the zipper which is longer than the zipper opening. This is not essential.
Do the same procedure for the left side of the zipper.
The next step is to sew the zipper. Get the fabric and zipper and place them underneath the zipper foot on your sewing machine. You need to have the top of the zipper and fabric right underneath the needle as you will start sewing from the top to the bottom of the zipper. Line up the zipper foot with the edge of the zipper.
To be completely sure that the positioning is right for sewing, sew a baste stitch. This is the longest stitch on a sewing machine which doesn’t have backstitching. It is a temporary way of holding your material in place before you sew a more permanent stitch. However, be careful. Basting can damage certain materials like leather, suede, silk, and stin because it causes extra holes which could be visible in these types of fabric.
Once you have done this, set your sewing machine on a straight stitch and sew along the edge of the zipper. Keep a good hold on the fabric and zipper as you sew. The zipper foot does provide some grip, but you still need to hold onto the material and zipper. Be careful not to sew over the pins as this could destroy your machine. Remove them once you have finished sewing.
Once you have sewn to the end of the opening and taken out the pins, backstitch over the stitches for extra security. As your zipper is 2 inches longer than the opening, don’t sew this bit.
The next thing to do is to repeat the process for the left side of the zipper.
Finishing the Zipper
When you finish sewing, close the zipper and fold the dress in half along the zipper. You will still need to have the dress inside out, with the zipper back visible.
Put a pin along the bottom edge of the zipper opening and then put another pin through the zipper opening fabric line, pointing towards the zipper stitch line. This pin meeds to go to the left of the stitch line so you can use it as a guide when you sew. You will be aiming to get a straight seam all the way from the zipper down to the end of the fabric. Sew downwards from the end of the zipper opening to the hemline of the dress. Be careful to ensure that the seam matches the zipper seam. You will also have to make sure that you don’t sew through the pins as that could damage your machine and you must only sew through the zipper fabric, not the zipper itself. This may seem simple, but when you are sewing quickly it can be easy to make mistakes. You can remove the pins after you have sewn the first few stitches.
Conclusion
We hope that you will be successful sewing an invisible zip into your new dress. It is a little fiddly to do, but take it slow and easy to start with and you should be okay. Precision and accuracy are the keys when sewing an invisible aip into your garment.

