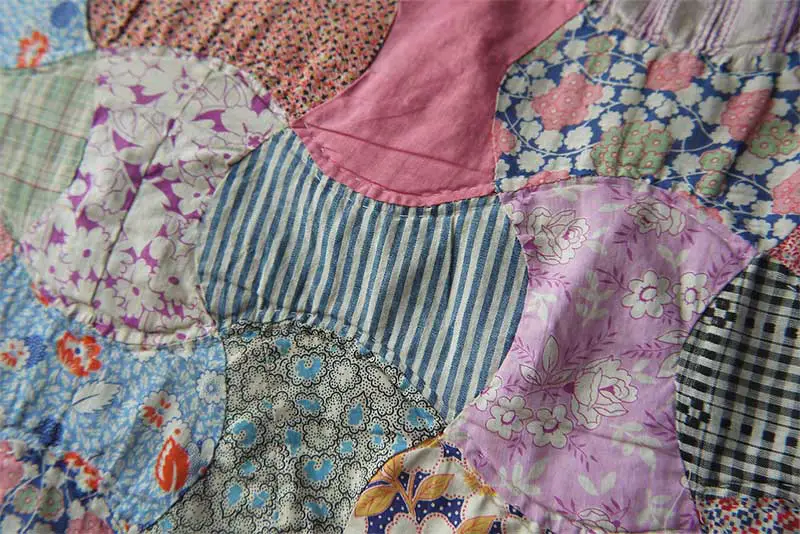
But what does it even mean to bind a quilt? The binding is, simply put, the edge of a quilt. It is a small strip of fabric you add to the edges of your quilt in order to finish it off. It is much like adding trim to a shirt, for example, but more useful.
Binding is added to a quilt that is already finished. The quilt could work just as well without binding. However, if you don’t add binding to the edges, this will make it much more likely that your quilt starts fraying at the edges over time. And considering how much time creating a quilt takes, you surely want it to last for years to come! And the longevity of a quilt will be much extended by simply adding the binding.
This is not the only advantage of binding your quilt, though. A quilt with binding will simply look much more beautiful overall! It is with binding that a quilt really stops being a work in progress and becomes a finished product.
Binding a quilt can be done by hand sewing or by using a sewing machine. In this case, we definitely recommend using a machine, and that’s what we are going to explain in this tutorial. Sewing by hand takes a lot of time and dedication, but the results will almost never be as durable and beautiful as what you can get with a regular sewing machine. Plus, using a machine takes much less time!
So how do you sew binding on a quilt? Let’s start with the tutorial!
Table of Contents
What You’ll Need
- Your quilt, obviously. Make sure all the edges are finished and excess fabric trimmed off before you start.
- Fabric for the binding
- Scissors or rotary cutter
- Cutting mat (optional but quite helpful)
- Iron and ironing board
- Ruler
- Thread
- Sewing machine
Step 1: Cutting the Fabric
First of all, we recommend using crosswise grain for quilt binding, as opposed to lengthwise. This means you’ll want to cut your fabric widthwise.
To start, you’ll want to figure out the length of binding you will need. To do this, measure the sides of your quilt. Add all of the sides together to calculate the total length of binding you will need. This means length of the quilt x2 and width of the quilt x2. You’ll want to add another 10 to 20 inches (depends on the size of the quilt) to this. This will ensure you have enough fabric to create beautiful mitered corners (more on that in step 4).
Now, in an ideal world, you would have a single strip that covers the total length of binding you need. However, this is unlikely to happen, as the piece of fabric you buy will not be that wide. Instead, you will cut it in strips. To calculate how many strips you will need, first measure the width of your binding fabric. Divide the length of the fabric with this number. The number you get is the number of strips you will need. If you have a bunch of decimals at the end, simply round up. So if the calculation says you need 7.85 strips, simply cut 8.
Now it’s time to calculate the width of your strips. In this tutorial, we’ll be doing a double fold binding (this indicates that the strips will be folded in half lengthwise). You can also make a single fold binding if you prefer in this case simply cut the width in half. However, double fold binding creates a much more durable end result, so we recommend sticking with it!
So how wide should your strip be? First, decide how wide you want the finished binding to be. You can experiment a bit with folded fabric and see what looks the best. Now, you’ll need 4 times the width you want for the finished binding (since there will be 2 layers), plus a little extra for the seam allowance.
Step 2: Sew the Strips of the Binding Together
Before you start, you’ll want to sew your binding strips together to create one very long strip. To start, take one strip of fabric end laying horizontally. Take another one and lay it vertically, so that the corners are overlapping. The two layers should be facing right sides together. The edges of your strips will now form a square. Pin the two pieces together to avoid any accidents.
Take a ruler, and mark the diagonal of this square. You will sew along this line. The triangle left in the corner we will simply trim off. Your two strips will now form one long strip with a diagonal seam. The diagonal seam works better than a straight seam because it creates fewer layers to sew through when binding the quilt, and it works better for hiding the seams in the final result. Continue attaching each strip to the rest in the same manner until you have one long continuous strip.
Once done, take your iron and press the new seams open. This will make them less bulky (and less noticeable). Next, you’ll want to fold the whole strip in half lengthwise (with seams inside) and iron it so it stays folded.
Now we are ready to start binding!
Step 3: Attaching the Binding to the Quilt
Take your folded strip and place it along the edge of your quilt. You can start at any point you like, but the middle of the long side of your quilt is a good idea. Line up the raw edge of the strip with the edge of your quilt. The folded edge should be on top of the quilt; facing the inside.
You can choose any seam allowance you like but ¼’’ is the most common. Now, simply sew in a straight line ¼’(or whatever seam allowance you choose) away from the edge. If you have a walking foot, go ahead and use that as it will prevent the fabric from bunching up. If you don’t. Simply keep the layers taut and go really slow. When you reach a corner, go ahead and sew all the way until you are ¼ inches from the edge. Then stop.

Step 4: Mind the Corners
Once you have reached the corner, you’ll want to turn your quilt 45 degrees. Now you can stitch diagonally to the edge of your strip. Make a few backstitches and cut. Now turn your quilt 45 degrees again so you can continue sewing the next side.
Before you start sewing again, fold the binding strip up (away from the quilt, and fold along the diagonal line you have just sewn. This creates a mitered corner. Then, align the strip with the top edge, and fold downwards. Your raw edge should be facing the raw edge of the quilt again.
Continue sewing straight down the side again, and follow the procedure for all 4 corners. When you reach the spot where you started, you’ll likely have some extra binding. Go ahead and trim it, but leave a couple of inches for the strips to overlap. Cut the end diagonally and tuck your tail inside the strip where you first started. Now just keep stitching until you sew a couple of stitches over the spot where you started. Backstitch and cut. We are done with the first side.
Step 5: The Other Side
The final part is stitching the binding to the backside of the quilt. Simply flip the quilt over, fold the binding, and start sewing straight like before. Try to sew as close to the edge of the binding as possible. These stitches will be visible at the end so do try to make them pretty.
Sewing the corners will be easier this time around too. When you reach the corner, simply fold it over first on the side you are working on, then from the other side. Now simply sew straight and let your needle go through both corner pieces. Pivot the quilt 90 degrees and keep sewing the next side.


